
- Upload Files to Multiple File-Hosting Sites at One Time
There are umpteen numbers of file-hosting sites on the Internet. If you had to choose one to upload your file, which one would you select? What if the file could only be accessed by some of the intended recipients? You would have to upload your file to another site.
Uploading files to many sites is a tedious task. You'll have to visit each site and individually upload your file there. This is a time-consuming and irritating task. It would be so much better for you to upload the file once and watch it show up on multiple sites.
Well, that's exactly what Uploadjockey does. This site allows you to upload a file once and then they put that file on other hosting sites. Uploadjockey will put your file on Rapidshare, Badongo, Megaupload, Zshare, Sendspace, and Depositfiles.
This is quite a good concept. Many file hosting sites have limitations like waiting time between downloads, slots per country, etc. This way, if you don't get the file off one site, you can try another one. For the uploader, all you have to do is upload the file once.
The site isn't perfect. For starters, you have the 100 MB file limit. But I think this has more to do with the fact that the sites it supports have a file size limit. Also, while uploading a file, there is no way to tell how fast you are uploading. A progress bar does appear but there's no mention of speed or how much of the file has been uploaded so far.
I don't know why someone would want to host files on Rapidshare, Megaupload, etc. that have so many restrictions. I usually prefer to use MediaFire, which I feel is far better. But who knows, the service may add other sites in future. [via gHacks]
Deleting files in your USB flash drive. Is it empty, yet? [MAC]
Well, when you delete files in your USB flash drive using Command Delete or drag them to the Trash, the file is actually not being deleted, but instead it is being hidden. Wow, but that's true. So from now on, if you really want to erase data from the USB flash drive, make sure you empty the Trash as well, or someone can see your hidden files when they plug it in to a PC.
Or for the paranoids (and it is recommended once in a while), go to Disk Utility (Press Command Spacebar and type disk utility enter). Select the USB flash drive on the left side of the panel, and click on the Erase tab and choose 'Erase Free Space..." You can select which method to erase (reclaim) the "empty space".
Remember that the 'Erase' button on your Disk Utility window is a whole different kind of story, so do not press that one, unless you want to reformat and erase the whole data.
And remember that your Volume Format will probably be MS-DOS (FAT) file system which is fine since you might bring this thing into a friend's PC :). So my suggestion is that don't use this 'Erase' button if you don't know what you're doing. (I learned the hard way, I reformatted the USB flash drive to MS-DOS (FAT) using my Mac on the other day, and now the PC won't recognize it and it needs to be reformatted under PC. [via AppleDoes]

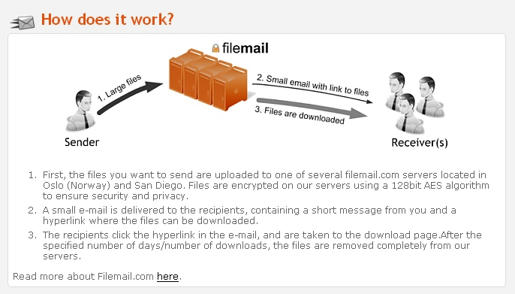
- Filemail - send up 2GB files as mail attachments without even registering

How does it work?
No comments:
Post a Comment